Instructions to Smooth Skin In Photoshop
Hi, world welcome to the best picture altering administration conveyance organization "Clipping Path EU". This organization furnishes best quality picture altering administrations with minimal effort offices. Cut-out way express more current instructional exercises for developing the general population worry about picture altering works.

Stage 1: Make A Copy Of The Image
With the photo as of late opened in Photoshop, the Layers board shows the photo on the Background layer. Before smoothing the skin, start by emptying any bothersome blemishes. To guarantee the principal picture, you'll have to tackle an alternate layer. Impact a copy of the Background to layer by pressing and holding the Alt (Win)/Option (Mac) key on your support, tapping on the Background layer, and dragging it down onto the New Layer image at the base of the Layers board:
Foundation Copy layer
In the Duplicate Layer talk box, name the layer "Spot Healing" and after that snap OK:
Spot mending brush device
A copy of the photo appears on another layer named "Spot Healing" over the first.
The basic skin cleanup will now be done on an alternate layer.
Stage 2: Select The Spot Healing Brush
Select the Spot Healing Brush from the Toolbar:
Spot recuperating instrument
Picking the Spot Healing Brush.
Stage 3: Set The Spot Healing Brush To "Content-Aware"
Guarantee the Type decision in the Options Bar is set to Content-Aware:
Content mindful
Content-Aware should be picked as is normally done.
Stage 4: Click On The Skin Blemishes To Remove Them
Tap on any bothersome skin flaws with the Spot Healing Brush to oust them. Photoshop will immediately "recover" the blemishes by supplanting the issue surface with extraordinary skin surface from the enveloping zone. For best results, make your brush insignificantly greater than the defect. To change your brush measure, press the right area key ( ] ) on your support to make the brush greater or the left segment key ( [ ) to make it more diminutive. If the defect hasn't completely left on the fundamental endeavor, settle your snap by pressing Ctrl+Z (Win)/Command+Z (Mac) on your support, by then resize your brush if vital and tap on a comparable blemish to endeavor afresh.
Outline: Removing Skin Blemishes With The Spot Healing Brush
In case we look at the woman's sanctuary in my photo, we see what takes after a tremendous pimple just to the other side of core interest. I'll position the Spot Healing Brush over it, and I'll make my brush fairly greater than a pimple itself:
Arranging the Spot Healing Brush over a skin defect.
To remove the defect, I'll tap on it with the Spot Healing Brush. Photoshop looks at the zone I tapped on, finds awesome skin surface from the domain including it, and after that blends the colossal surface in with the issue zone's one of a kind tone and shading. Like a charm, the imperfection is no more:
SP instrument utilizing 1
SP instrument utilizing 2
I'll complete a comparable thing with another flaw on her sanctuary, keeping the Spot Healing Brush marginally greater than the locale I need to recover.
I'll tap on the blemish, and eventually, Photoshop in a brief instant ousts it:
After several more snaps with the Spot Healing Brush to clean up whatever remains of the flaws on her temples, her skin is starting at now looking much smoother:
Clearing Blemishes, Not Features
As you're adjusting the skin, recollect that while it's okay to clear passing issues like skin break out or other minor skin issues, it's normally not okay to oust constant features like moles or even certain scars, as these are a bit of what makes some person their character. Everything considered the target of picture changing is to empower people to look great, not to impact them to seem like someone else.
Completing The Initial Skin Cleanup
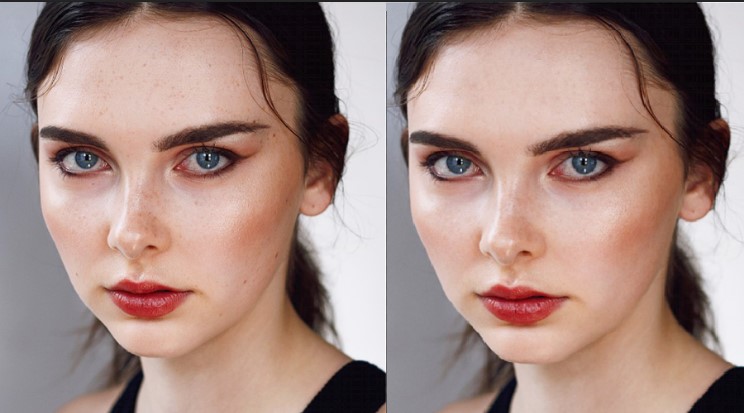
Continue working your way around the person's face to remove any lingering blemishes. Here's a one alongside the other examination of what the woman's skin looked like at first (left) and after some expedient altering with the Spot Healing Brush (right). With most photos, this hidden skin cleanup should take near two or three minutes. I secured the Spot Healing Brush quickly here, yet you can take in additional about it in my Removing Acne, Skin Blemishes With The Spot Healing Brush instructional exercise:
A first (left) and after (right) connection of the hidden skin redressing.
Stage 5: Make A Copy Of The "Spot Healing" Layer
With the defects cleared, we're set up to smooth and reduce the skin, and yet again, it's best to manage an alternate layer. Back in the Layers board, make a copy of the "Spot Healing" layer by crushing and holding the Alt (Win)/Option (Mac) key on your support, tapping on the "Spot Healing" layer, and dragging it down onto the New Layer image:
Spot mending brush apparatus
In the Duplicate Layer trade box, name the layer "Smooth Skin" and after that snap OK.
We now have the principal picture on the Background layer, the fundamental skin cleanup on the "Spot Healing" layer, and another "Smooth Skin" layer above them:
Stage 6: Apply The High Pass Filter
To smooth the skin, we'll use Photoshop's High Pass channel. Go up to the Filter menu in the Menu Bar, pick Other, and after that pick High Pass:
Channel High pass
Going to Filter > Other > High Pass.
Why The High Pass Filter Is Great For Smoothing Skin
In the event that you're alright with the High Pass channel, it's no doubt since you've used it to sharpen pictures in Photoshop. In spite of the way that we'll be using High Pass to smooth skin, not sharpen it, an impressive parcel of the methods are the same. The High Pass direct scans for edges in the photo and highlights them. An edge is where there's a noteworthy, sudden change in wonder or shading between neighboring pixels. With portrayal photos, the edges are generally along the person's hair, around the eyes, the mouth, and whatnot. Skin surface, of course, has for the most part low measures of detail with much smoother changes. These regions are not seen as an edge, so rather than highlighting them, the High Pass channel fills these zones with unbiased dull.
If we were sharpening the photo, the High Pass channel would empower us to sharpen the edges (the purposes of enthusiasm) without impacting the skin. In any case, for smoothing skin, we use High Pass for the opposite reason. We'll distinguish the edges not so we can sharpen them yet rather so we can smooth and smooth everything except for the edges. We ought to see how its capacities.
The Radius Value
The High Pass channel recognizes edges and highlights them, and the Radius elective at the base of the High Pass talk box controls the "thickness" of the edge including. Toward the day's end, once Photoshop has recognized an edge, the Radius regard uncovers to it what the number of pixels on either side of it to fuse as a component of the edge. Low Radius regards will highlight only the finest inconspicuous components in the photo. In any case, to guarantee we don't end up softening these basic inconspicuous components, we need to include the domains around them likewise, which suggests we require a greater Radius regard. For an ordinary picture shot, a scope of 24 pixels works honorably:
Radios High pass
Setting the Radius motivator to 24 pixels.
If your subject is further back in the photo, or you're tackling a lower assurance picture, a smaller Radius estimation of 18 pixels or even 12 pixels may work better. Why these specific characteristics? This is in light of the fact that it's indispensable for the ensuing stage that you pick a Radius regard that is successfully distinct by 3. For example, 24 isolated by 3 is 8, 18 segregated by 3 is 6, and 12 apportioned by 3 is 4. Charming, basic numbers. Yet again, we'll see why in the ensuing stage.
Snap OK to close the High Pass talk box. Your photo will turn by and largely dull. Solid zones of dull are the non-edge domains with for all intents and purposes no detail, like the skin, while broad, high distinction crowns include the edges:
High pass layer
Stage 7: Apply The Gaussian Blur Filter
We need to cloud the High Pass channel effect. It may seem, by all accounts, to be unreasonable, in any case, the clouding will truly draw out the more extraordinary surface in the skin. Go up to the Filter menu, pick Blur, and after that pick Gaussian Blur:
Gaussian Blur
Going to Filter > Blur > Gaussian Blur.
In the Gaussian Blur trade box, set the Radius motivating force to definitely 33% of the regard you used for the High Pass channel. For my circumstance, I set the High Pass breadth to 24 pixels, so I'll set the Gaussian Blur range to 33% of that, which is 8 pixels. Snap OK to close the trade box:
Obscure picture
With the clouding associated, the High Pass affects now looks gentler and less point by point:
The happen to ensure to applying the Gaussian Blur channel.
Stage 8: Change The Layer Blend Mode To Linear Light
In the Layers board, change the blending technique for the "Smooth Skin" layer from Normal to Linear Light:
Direct light
This blends the High Pass result in with the photo, making a high many-sided quality, over-sharpened effect. It may look shocking, be that as it may, don't pressure. It will look significantly more wretched in a moment:
The photo in the wake of changing the Smooth Skin layer's blend mode to Linear Light.
Stage 9: Invert The Layer
Go up to the Image menu, pick Adjustments, and after that pick Invert:
Transform
Going to Image > Adjustments > Invert.
With the layer adjusted, the photo goes from being over-sharpened to looking like a strange, foggy bother tremendous revolting crowns
Comments
Post a Comment